
[a kind of, sort of, tutorial of sorts...]
So I thought it might be nice to get you all that travel desk tutorial I promised you before the summer was over. Maybe you can squeeze in some sewing time right before your last road trip of the summer. This might seem pretty extensive but I promise that it's easier than it looks! My sewing skills/vocabulary/etc. are still novice so I apologize if some of the steps don't make sense. Hopefully the pictures will help.
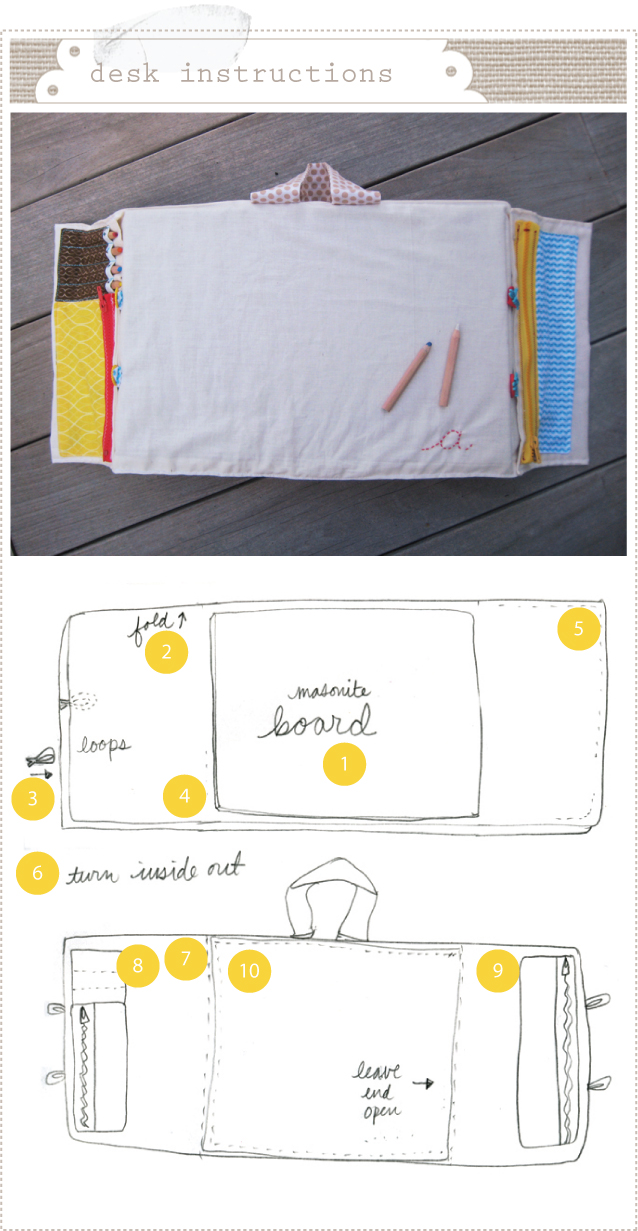
1. Start with a board (any size you like). I used masonite but if you are intending to use this in the car it might be a better idea to go with a thick cardboard of sorts, or something softer than masonite, for safety reasons.
2. Measure the fabric so that when folded there is just enough room on the top and bottom of the board for seam allowance. Leave as much room on the sides as you like for folding over pockets.
3. Make loops for pocket closures (you can use bias tape or ribbon if you like) and sew them on the inside of the folded fabric.
4. You'll laugh but I can't remember what 4 is for. I say just ignore it.
5. Sew around fabric leaving opening for turning.
6. Turn fabric inside out.
7. Baste or mark area where board will be. Sew handle on to whichever side you want the top to be (you can also do this earlier like the loops in step three). I just realized that my drawing has the handles in different spots but I'm too lazy to fix it. Just play around and put it where you want it.
8&9. Sew on pockets (turning and sewing edges under ahead of time). I used large coat size zippers and sewed them straight onto the pocket fabric. You can also add a pencil pocket to the side.
10. Sew on pocket for board leaving opening for board to slide in and out.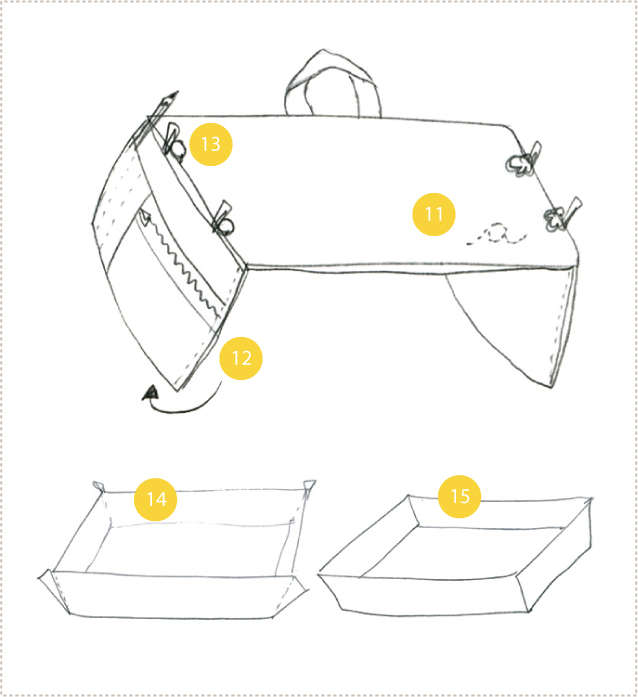
11. Hand embroider initial to lower right corner (or wherever you like).
12. Fold up pockets and sew shut.
13. Sew buttons on for loops to close.
14. Sew pillow pocket. You can make this as deep or as shallow as you like. Sew sides at an angle.
15. Turn inside out.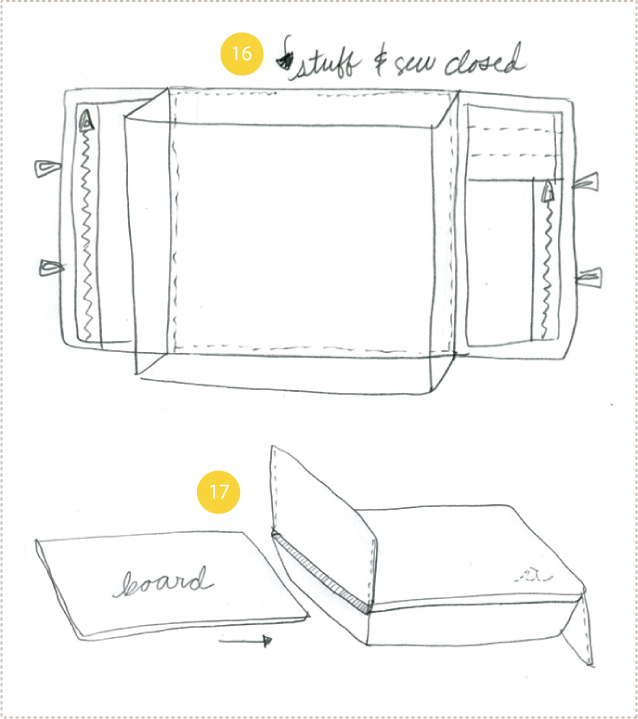
16. Sew pillow pocket onto desk leaving opening for stuffing. Stuff pillow. Sew closed.
17. Insert board. You are done now ready to use your new desk!
*I also keep coloring and activity books under the board for storage. You can also add a metal sheet on top of the board for magnetic activities. Another variation would be to sew plastic on top to make it easy to wipe clean if used for eating. This is something I might do later.
I hope this was helpful. If you have any specific questions along the way I'll do my best to help you out. Happy sewing and last minute traveling!
**Oh and a big thanks to Ohdeedoh and Cafe Mom (and any other kind bloggers) for posting about Little A's desk!


So cute! The fabrics are so cheerful!
ReplyDeleteThanks for sharing, I can't wait to try it!
ReplyDeleteOh my goodness! THANK YOU!!! I was going to email you about this, since I am dying to make some for my kids. Brilliant!!!! you're a rock star.
ReplyDeleteHi - have just left a comment on the first post and came to your instructions just after! They're brill. Am going to have a go at cutting it all out after tea.
ReplyDeleteI really want to make this! Thank you.
ReplyDeleteSo, so cute. What a great idea/tutorial. I am going to make this one of my weekly "finds" on my blog. It would be wonderful for either a kid or an adult.
ReplyDeletethanks so much for taking the time to do the tutorial -- it's a great project!
ReplyDeleteDid you buy your masonite at Dick Blick, or did you purchase it locally? If you got it locally, where did you get it and how did you find/identify it? I've been told that the home improvement stores should sell it, but no one knew what I was talking about when I asked about it.
ReplyDeleteRachel - Seems like the term "masonite" is not as common as I thought (I've always used it in art classes but perhaps it's not that universal). I believe it's similar to MDF or fiber board (and if not, MDF should also work). But as I mentioned, If you are traveling it might best to go with something softer, like foam core: http://www.amazon.com/Elmers-FOAMBOARD-20X30-10-10pk-951120/dp/B0006VRTZM/ref=sr_1_1?ie=UTF8&s=office-products&qid=1252692656&sr=8-1
ReplyDeleteI have a stack of small chalk boards I bought at a retired teacher's yardsale that I've been wanting to turn into some kind of lap desk... I love your design and am trying to think of a way to use it so the chalkboard stays on top and is usable. Thanks for the inspiration!
ReplyDeleteThis is such a clever project! I linked to this from my blog - I hope that's alright. Thanks for sharing this great idea :)
ReplyDeleteI love this tutorial and included it in my Tutesday roundup on my blog at http://www.lisaashby.com. :)
ReplyDeleteLisa
Popped over from Chez Beeper Bebe; this is great!
ReplyDeleteThis is flippin' brilliant! And I love that you forgot what number four was for almost as much as I love the fact that you didn't fix it!
ReplyDeleteWow looks great when it's finished. My next sewing project is going to be this.
ReplyDelete-Zane of ontario honey
I mentioned this tutorial on my blog. Onetwoplusmeandyou.blogspot.com
ReplyDeleteThanks for the inspiration!
-Kelly