
[get frightfully festive this Halloween with...]
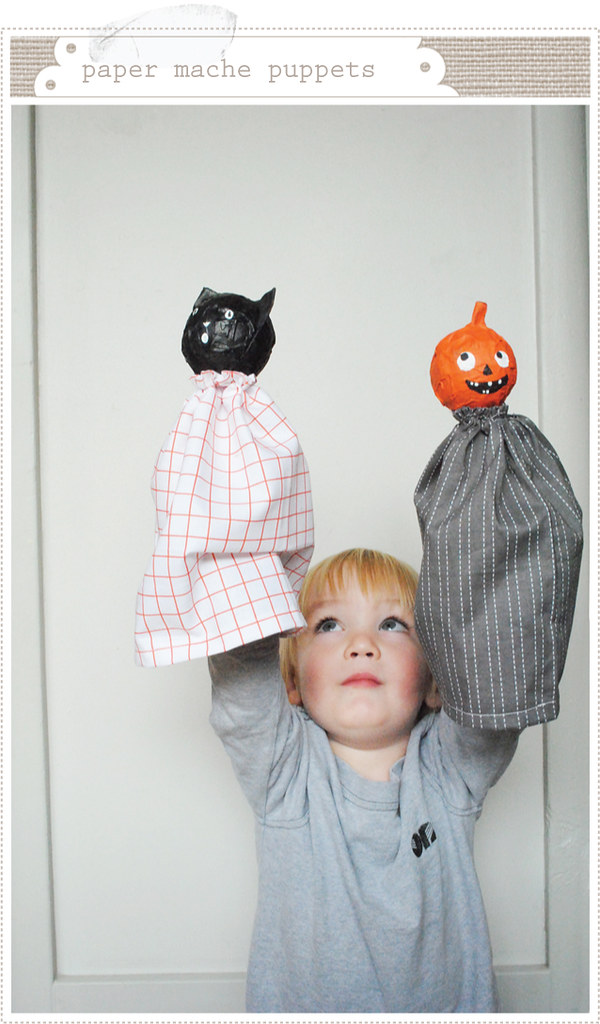
We've been having a lot of spooky fun over here - attending gigantic pumpkin contests, going on school field trips to Pumpkin Land and most recently making these very fun paper mache Halloween puppets.
They are pretty simple and the boys are in love with them. In fact, little O now asks to play with them every other minute.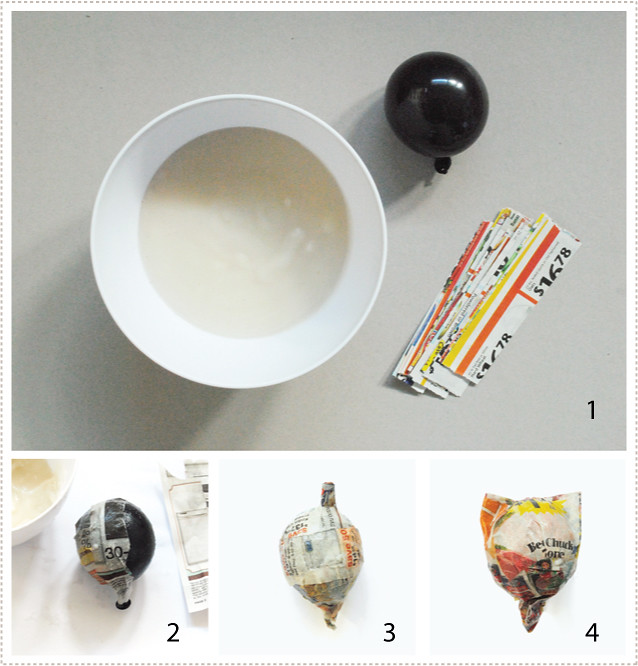
1. To get started, all you need is a small balloon, some basic home made paper mache mix (1 part flour to 5 parts water... boil about 3 minutes and let cool) and a few strips of newspaper.
2. Dip newspaper strips into the paper mache mix and place over the balloon.
3. Using no more than four layers, cover the balloon thoroughly. You can add additional shapes such as a pumpkin stem...
4. or fold up some paper for some cat ears. Let dry overnight.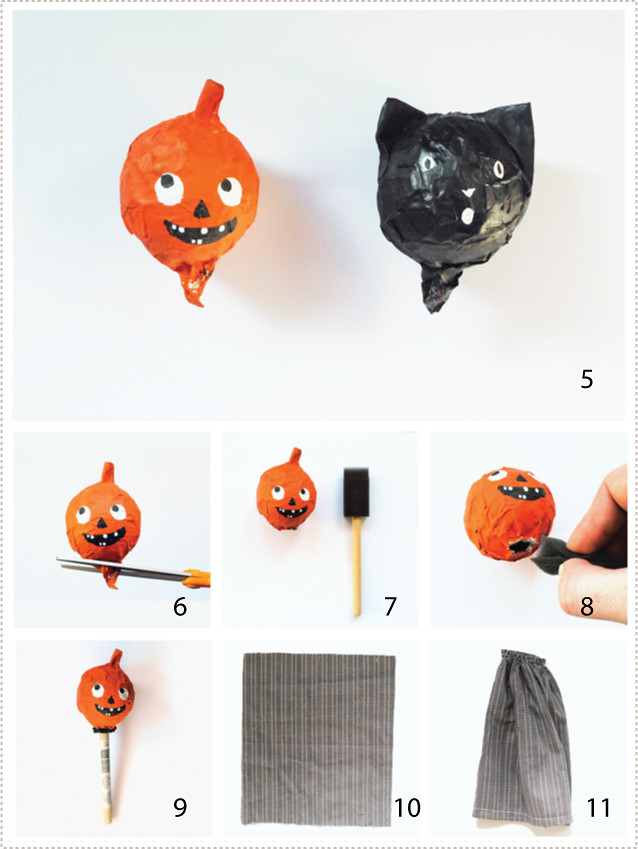
5. Once completely dry, paint on desired face.
6. Clip off the part of the head where the tail end of the balloon is. If this doesn't pop the balloon, pop it and then take the balloon out.
7. Grab a handy sponge brush to use as the perfect puppet stick.
8. Fold up sponge brush and carefully place inside of head.
9. Leave the very tail end of the brush outside of the head to act as a stabilizer.
10. Now that you have your puppet structure assembled, you can choose what type of fabric you would like. I cut 2 sheets of fabric at 10"x 9".
11. Sew sheets of fabric together at the sides (with right sides facing each other). You can either choose to hem the fabric at the top and bottom or leave it as it for a fun, unfussy, spooky look. From there, use a gathering stitch to gather the top of the fabric together.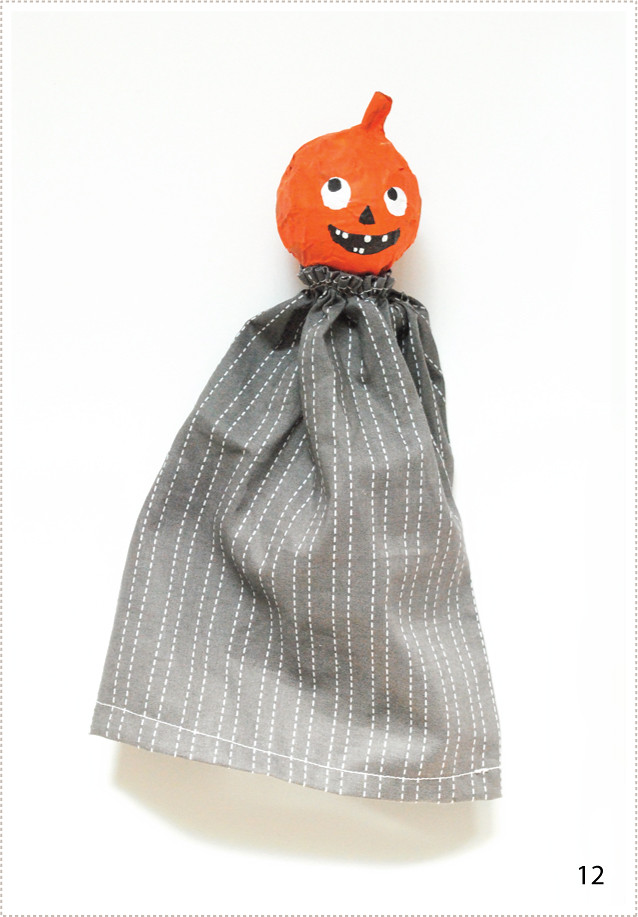
12. Hot glue the gathered end of the fabric straight onto the base of the puppet's head. Let it dry. Feel free to repeat the process for any number of festively fun puppets! Have lots of fun puppeteering for the rest of the afternoon!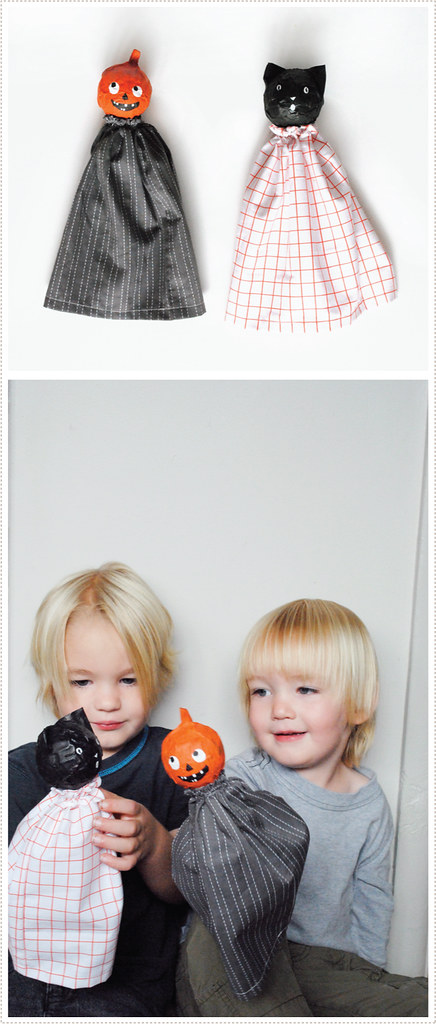
And having fun puppeteering is just what we did! It's always so exciting to see which projects really pull the boys in, and I'm happy to report that this one was a real winner!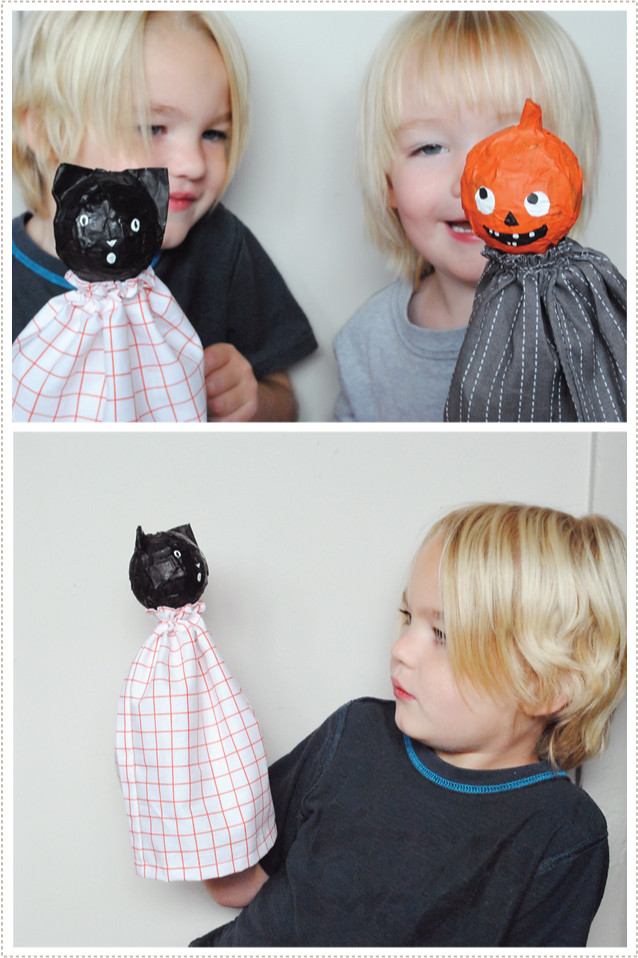
They spent hours with the puppets and I spent the rest of the afternoon seeing happy faces and little orange and black heads bobbing up and down.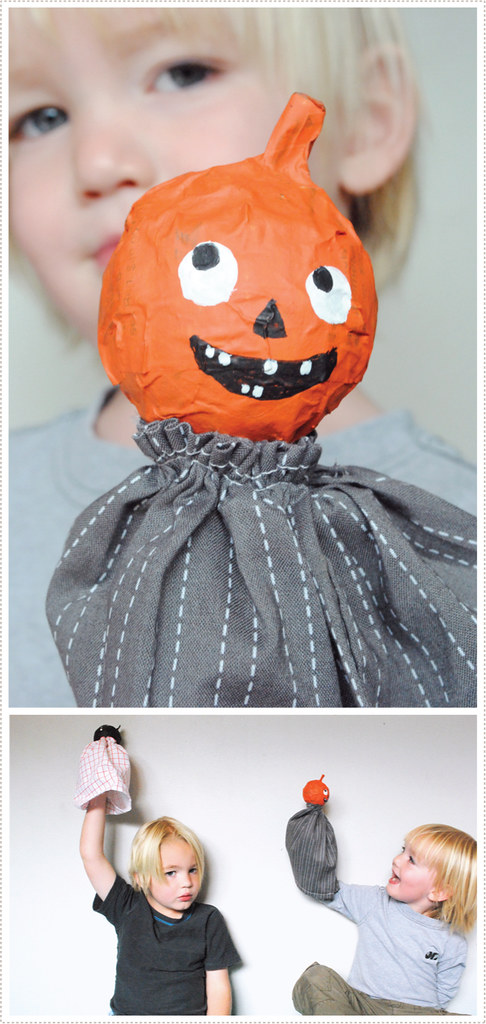
Little O was particularly taken with them and will still ask me if he can play with them nearly every other minute, promising me that he will be Oh so careful with them. It's so adorable, so I of course let him.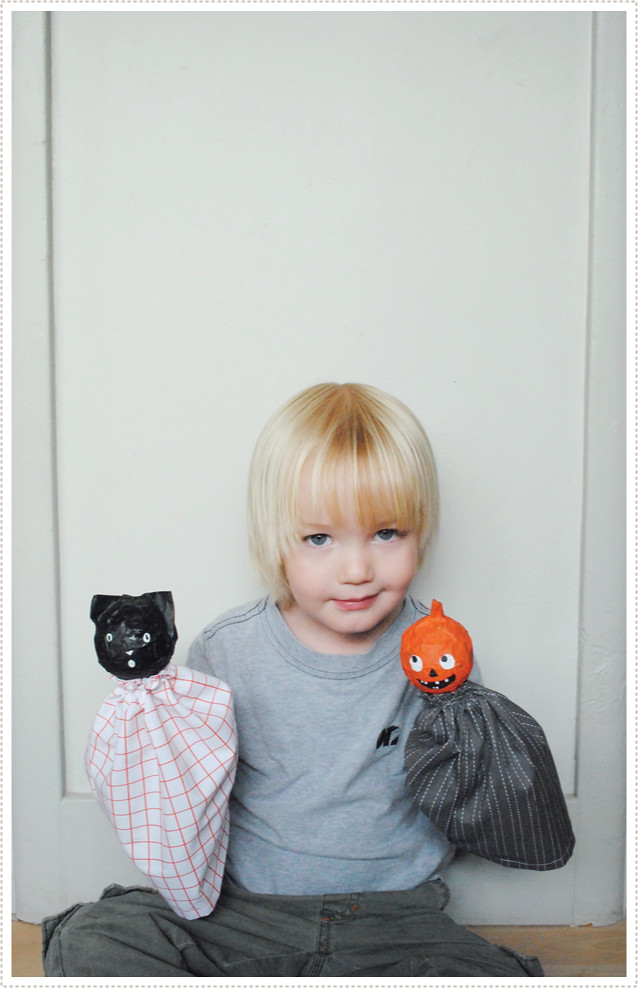
This project is also a great one to pull the Littles in on. I made a few extra pumpkin heads for them (or you can have them get their hands dirty and do the paper mache themselves! They'll love it!). Simply use the tail end of the balloon as the stem, give them some orange and black craft paint and then and let them have at it.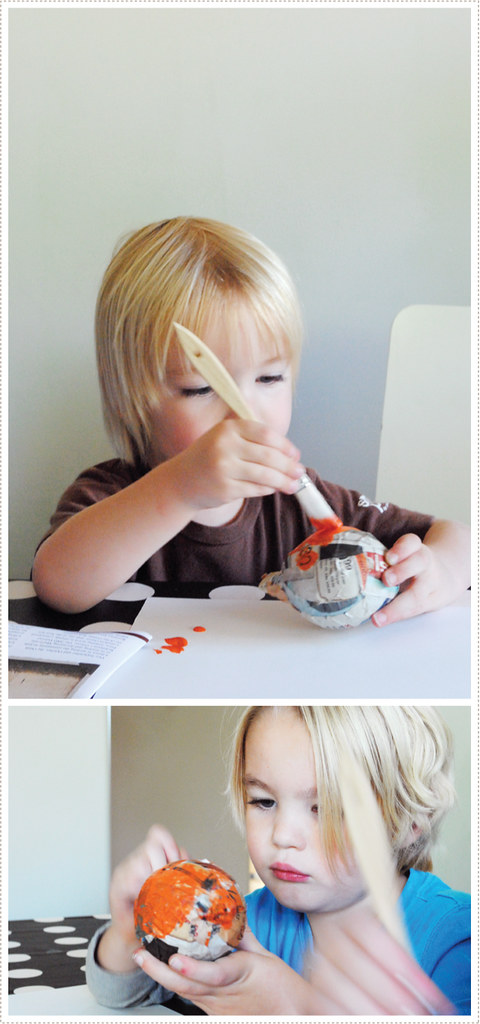
They really got into painting their little Halloween creations. I'm especially fond of the creepy black paint dripping from Little A's pumpkin head. So fitting.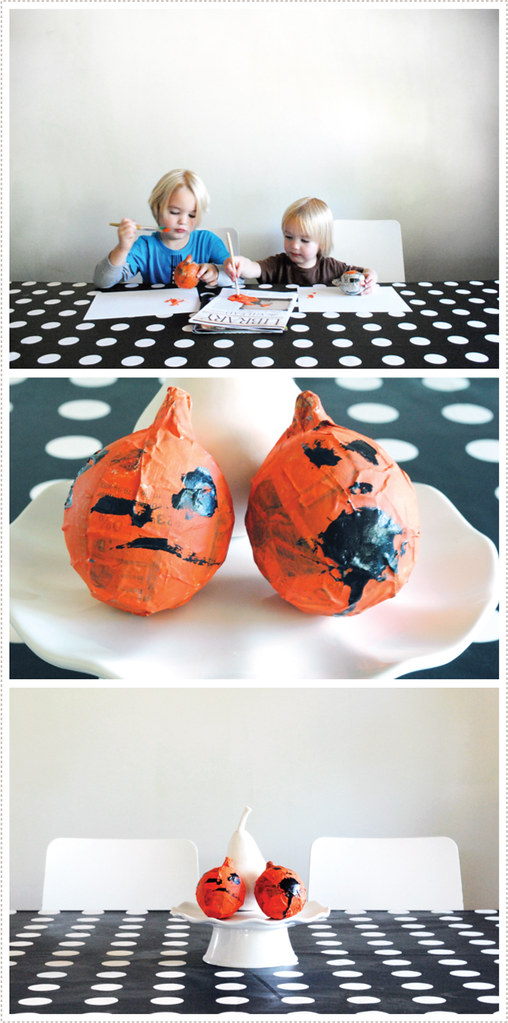
And they make great center pieces which happily remind me on the fun we had. And I must say that it's nice to have a set that is more kid friendly. When the boys threw them around the house and smashed in their sides, I was perfectly OK with it.
The puppets on the other hand...
well those are showcased in a safer place and come down only with some supervision...which merely means I'm supervising...A LOT.


They are wonderful. I would love it if you would share it on my new link party at http://craftymomsshare.blogspot.com/2011/10/sharing-saturday.html
ReplyDeleteThank you!!
The puppets are almost as cute as their puppet masters.
ReplyDeleteoooh! i love these, and want to make little garlands <3
ReplyDeletevery nice idea!
ReplyDeleteThose are so cool! I'll have to try these when Dev gets a little older!!
ReplyDeleteSo cute Mer mer! So sorry you didn't feel well we love you and send loves and well wishes
ReplyDeleteLove the vintage feel of the puppets!
these are perfect. i'm not showing my daughter because then she'll want to go live with you because you're clearly having a great time over there!
ReplyDeletewow ! I love.
ReplyDeletehttp://avecmesmains.over-blog.com
I love your blog, thanks so much for sharing!
ReplyDeleteI plan on pre-making some of these for my son's preschool class art project and letting them paint them. I think we'll do more of an ornament though...
so cute!
Thanks for the great ideas! Baby T loves his puppets
ReplyDeleteVery COOL! How smart to use the paint brush for a stick! Thank you!
ReplyDeleteHow delightful and they look like they were such fun to make.
ReplyDeleteThese are so cute and vintage-y!! Great job!
ReplyDeleteWhat a great craft project! So did the puppets make it to Halloween 2012? :)
ReplyDeleteHi Nancy, Yes they did! They are sitting right next to me in perfect condition and the boys have enjoyed playing with them this season as well. thanks for asking!
Deletexo
mer