
[we've gone giddy for...]
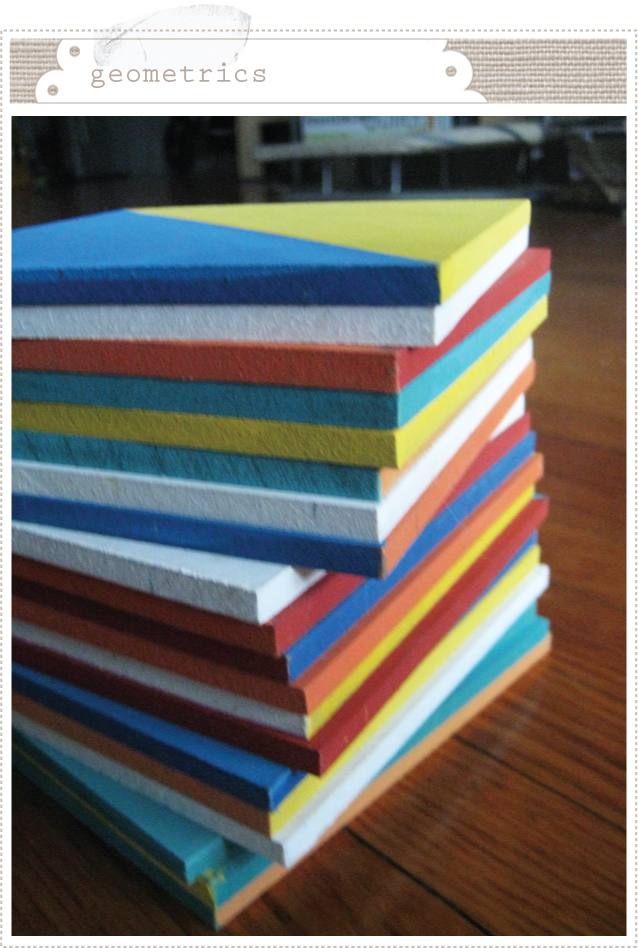
Our Little A is a budding mathematician (or at least that is what his very biased mother thinks) and we are more than encouraging it (hey, the arts are great and all, but any other way to make a living and we say go for it!). He's been obsessed with puzzles for quite some time and is especially fond of shapes and matching, etc. We have a lot of Montessori toys that he enjoys but I've had this idea for a geometric art puzzle that I wanted to try with him. Last summer (yes I've had this project idea stewing for far too long...seems to be the way things go around here) I went to Home Depot and had them cut a large sheet of 1/4 inch hardboard into five inch squares. Just this week I finally managed to paint them into colorful triangular shapes. I used acrylic craft paint and a sponge brush (don't use a bristle brush, it will just frustrate you).
As soon as Little A saw them, he went to town and I loved what he came up with. The amount of beautiful designs is truly endless. I have to confess that I'm having just as much fun with them as he is!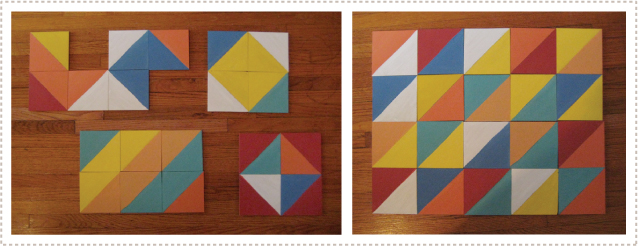
My original plan was to apply Velcro to the back of each square and then mount them onto the wall as a movable art piece (an idea I got from a friend, Amy Palmer, while living in Brooklyn. She had various shades of blue squares hung above her couch and it was true eye candy). However, once I saw the "out-of-the-box" designs that little A made, I knew these were better suited as a floor activity.
I might still hang them on the wall as a visually appealing home for them while they are not in use, but for now we are enjoying sliding them about, mixing and matching, this way and that. Talk about just the thing to do while cooped up indoors during this week of California rain storms.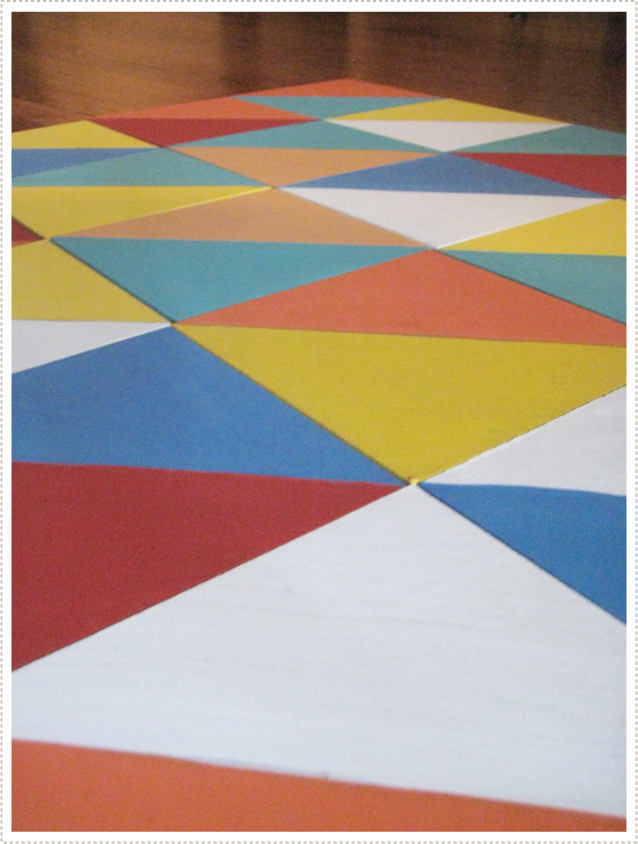
*To get the sharp diagonal I took a ruler and made a pencil line from corner to corner before painting. From there I just eyed it (taking advantage of the clean line a sponge brush can give you) but if you are a perfectionist you might want to try taping it off.


how very fun! WTG, mom
ReplyDeleteWhat a simple, yet fantastic toy. Looks like Atticus is already very talented!
ReplyDeleteI so want to copy you (get Mike to copy you)! Cool, cool toy!!
ReplyDeleteI love this idea! wow! I am going to try it! You always have the best ideas! thanks!
ReplyDeleteSo inspiring. I'm going to have to do this. To paint a sharp diagonal, did you use tape or just eyeball it? Thanks!
ReplyDeleteWay cool. I love it.
ReplyDeleteThis is so great! When your little man gets a bit older, he might enjoy one of these:
ReplyDeletehttp://tinyurl.com/yjgj6kh
I have one that lives on my coffee table and I love it.
thanks everyone for the kind words!
ReplyDeleteJenn- I added this addendum: "To get the sharp diagonal I took a ruler and made a pencil line from corner to corner before painting. From there I just eyed it (taking advantage of the clean line a sponge brush can give you) but if you are a perfectionist you might want to try taping it off."
These are so cool! Just wondering if you have a clever way to store them. Thanks for the idea!
ReplyDeleteWhat a fantastic idea! Did you just choose the paint colors for each square randomly or did you plan it all out?
ReplyDeleteLove this one! With three boys (1,5,7) who all seem to be very visual and mathmatical...I am inspired to do this project! Thanks! I hope to blog about it on my blog and link back to you.
ReplyDelete-Amanda
these are spectacular!!!! I can't wait to make them for my little one. I hope you don't mind, but I linked to you from my blog... if you mind at all, please let me know and I'll take it down. My second baby is due tomorrow, and I tend to forget about awesome ideas like this if I just bookmark...so I posted about it so I'd remember after the baby comes.
ReplyDeleteWant to do this...
ReplyDeleteThat is an absolutely brilliant! I just might have to copy you too, but it will probably take me a year or two.
ReplyDeleteI think I know what JR's next project will be!
ReplyDeleteThese are amazing. I'm going to head to home depot and get some squares cut. Such a great gift idea, too.
ReplyDeleteAmazing! I'm definitely going to make this for my girlies. They're total roughnecks, though, so I'm also definitely going to seal the acrylics after I paint them.
ReplyDeleteWhat an easy-yet-fantastic project!! I'm adding this to my list of projects (it always grows longer, never shorter!) to do this year!
ReplyDeleteI LOVE this & want to make it this weekend.....how much does Home Depot charge to cut the wood? Thanks!!
ReplyDeleteAs an educator, I applaud you. Combining art and math, this activity has endless possibilities.
ReplyDeleteFabulous! Go crafty Mumma!
ReplyDeleteIt's always the simple toys that you remember and are the most fun!
wow, these are great! and will be on my to-do list, thank you for sharing.
ReplyDeletei think i found my project for the weekend! great idea. i have been toying with the idea of some natural blocks cut from fallen oak branches in the woods around our home. i think this is going to come first though :)
ReplyDeleteI love this idea! Did you have a whole 4' x 8' sheet cut? Or did you opt for something smaller, keeping the remainder?
ReplyDeleteGosh...I hope the rest of our snow melts soon so I can run out to Home Depot!
Love the blog, some great stuff here, well done from all at http://nichegallerycouk.blogspot.com
ReplyDeleteI was wondering if you put felt on the other side they would slide easily on your floor and not scratch. This also could serve a dual purpose of using for felt boards..
ReplyDeleteThat so appeals to a quilter like me.
ReplyDeleteWell crap, add one more visual project to my list that I want to do and probably won't. These are awesome.
ReplyDeleteI was so inspired that I went to Home Depot today--got my board for around $5 and the guy cut it for free! Can't decide if I'm going to do felt on the back, or velcro, for a cool "installation." Really wonderful idea! Thank you so much...I re-blogged and sent everyone here for instructions and all credit, just so you know...http://sweetsweetlife.typepad.com/sweet_sweet_life/
ReplyDeleteAwesome ideas, as always...Amy
I love it, it looks like so much fun. I think I'm going to make one.
ReplyDeleteI've blogged about it (www.enelpaisdelashadas.com), I hope it's okay with you!.
Simple, smart and versatile. Well done!
ReplyDeleteBrilliant! We'll have to give it a go, for a fun pop of color in this deep mid-winter.
ReplyDeleteMolly
http://www.remedialeating.com
I can't say how much I love this. The colors are fantastic!
ReplyDeleteIt's always excellent when it satisfies all ages!
ReplyDeleteI love it! You are so talented. Can't wait to make one for me! ;)
ReplyDeleteI am so bummed - I have tried not one, but TWO Home Depots to get a sheet of 2' x 4' hardboard cut for me and NO ONE WILL DO IT. ARGH. They say that 5" squares are too small for their sawing thingy and that cutting pieces that small will split the wood. *sob* What's everyone's secret to getting the wood cut?? I can't even find anything online for cheap.
ReplyDeleteN- Call Home Depot and see if they will cut 6" pieces. I know 5" is pretty small and I think they told me something similar. Hopefully they will do it at 6". Good luck!
ReplyDeleteMer
very cool! I've listed it in a Spring Break roundup on my blog, The Handmade Experiment. I've got tutorials on things to make and things to bake and a couple of cool etsy artists for things to take this spring break. Come on over and check it out and thanks for the inspiration!
ReplyDeletehttp://emilyflippinmaruna.wordpress.com/2010/03/08/spring-break-week-things-to-make-bake-and-take/
N.:I had mine done at Lowes, but you have to pay .25 cents per cut - it was about $4.50. Unfortunately, your HD people were right, the edges on almost all of my squares are really rough and broken a bit. I'm hoping I can save it with sand paper, but not looking forward to the project now. I might have wasted $12. :o/
ReplyDelete~Molly
great project. i've made several as presents and just wrote it up @ my site. thanks so much for sharing! my little people really enjoy it.
ReplyDeletewhat a great idea.
ReplyDeletei'm totally in love with this idea...so easy, so much fun.
i'm linking.
thanks for this tutorial, doro.
this is awesome!! i know this is an old post, but i just saw it on pinterest. love this and so going to try it!!
ReplyDeletecant wait to make these and give them out as christmas gifts!!! can hardly contain myself eeeeeek!
ReplyDeleteSeems the tricky thing here is getting the board cut... when I went to Lowes today they quoted the 25 cents a cut thing, and it was calculated to be over $25 to cut, $13 for the board, so it would have cost almost $40, which is quite a bit for a DIY project!! I guess I will have to keep trying... I'll go to Home Depot soon and try there. I was trying to get 6" squares because it made more sense with the dimensions anyways.
ReplyDeleteI'm so excited to try this! Luckily, or so it seems from discussion above, I can cut it at home.
ReplyDelete