
DIY circle punch art
The boys and I had a fun weekend working on some artwork for their room. We've been in our new place for over six months and I think it's high time we got something on the walls, particularly in the boys room. I wanted to do something simple and graphic, and most importantly, something that the boys themselves could do, pretty much on their own. So we came up with a circle punch art idea.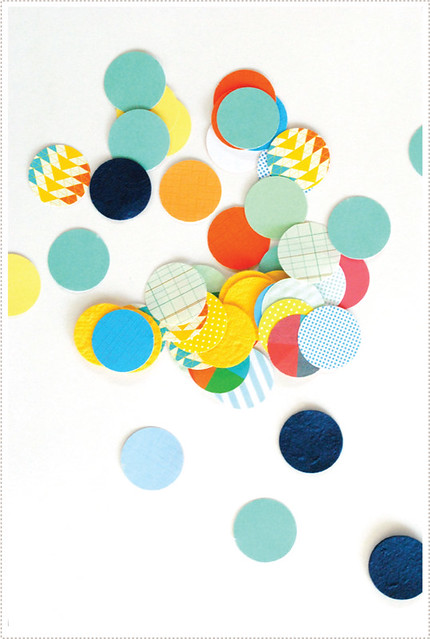
We started with several 1 1/4 inch circles punched out a various types of patterned and textured papers. Little A (5) was especially good at punching out the circles and did quite a few of them on his own. Little O (3) did a few as well but had to have help pushing the punch.
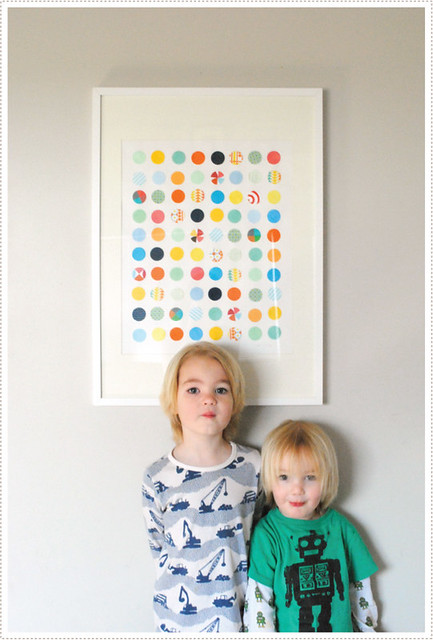
We decided to make our artwork based on a couple of 28 ¼" x 40 ¼" IKEA RIBBA frames that we had. So we cut a large sheet of white poster board to fit nicely in the frame, at least 1/2 inch larger, on all sides, than the mat window measurements of 27 ½" x 39 ¼".
I then proceeded to measure out where we wanted the circles to go. I made little dots for where they boys could place the circles. I measured 1 3/4" between each one (I liked how the spacing looked at this distance but you can do whatever you feel looks good based on the size of your circles).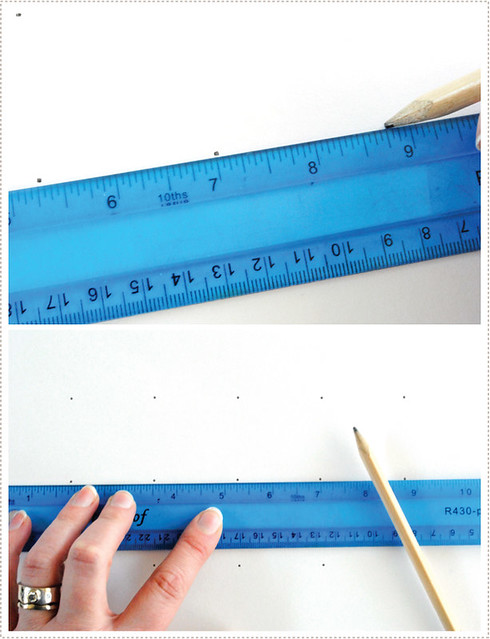
I then let the boys place the various circles on the marked grid.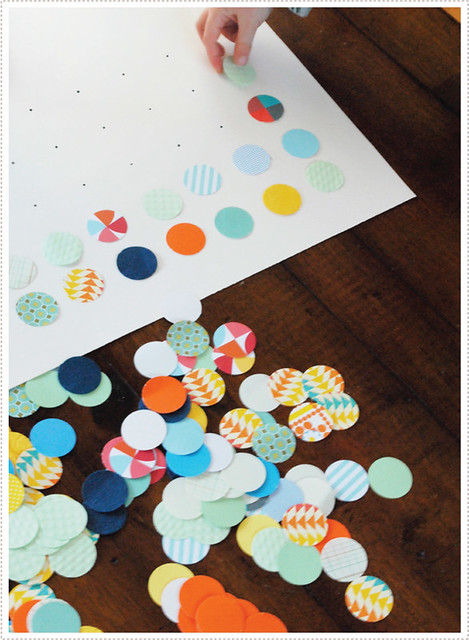
And let me tell you, they had a lot of fun doing this. I never know how they will react to certain craft projects and i was a little surprised at just how into this one they got. I think they really loved the freedom of it and how easy it was to figure out. They took turns placing the different circles (we are just laying them out at this point to see how things look, we didn't glue them down until the very end) and were delighted to see how things slowly came to life, the more circles they placed.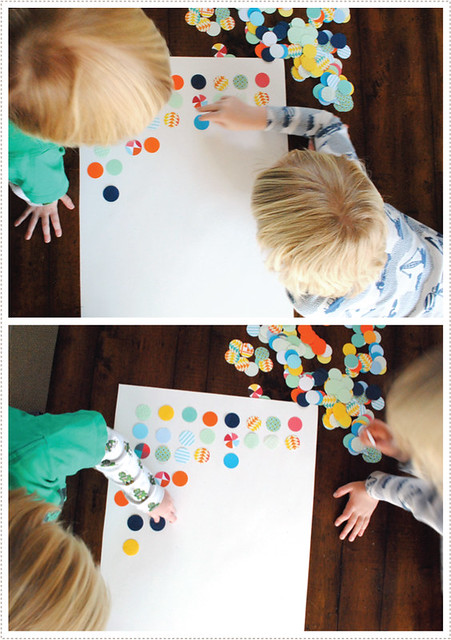
Little A was very particular about not using the same colored/patterned circle in one line. He also would notice if we didn't have a lot of circles in a particular color/pattern and was quick to punch out a few more so it would be more even. Little O was less concerned about that and just loved placing as many circles as he possibly could. Their different approaches definitely stressed each other out but we worked it out together. I also decided that we would do two of these so that each boy could have more ownership over one than the other and so that we could put each one over their beds.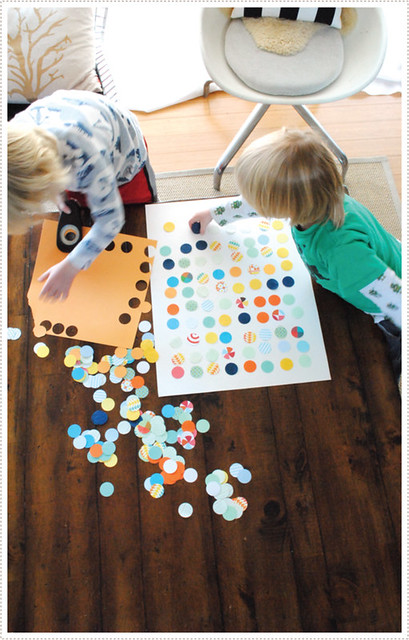
Once all the circles were laid out we talked about how we liked the look of things. I'd ask them questions such as "What do you think about all these blues and yellows together? Do you think we should space them out more and replace some with different colors and patterns?". I'm a big believer in helping your child see shapes, colors, patterns and just the general design of things. I think kids gain more confidence from an art project that has some limitations, helping them learn about good design, than I do from a free for all (which is, I concur, an appropriate approach for certain projects at certain times).
Once we were happy with the overall layout of the circles I had the boys glue them down (using the "dot, dot, not a lot" mantra), which they LOVED. We used simple Elmer's glue because that is what we had and to keep things easy for the boys, but you could use glue sticks or glue dots or really any type of adhesive you prefer. The boys took turns as to who would glue and who would place the circles. They loved each job immensely.
Once everything was glued down and dry, we placed the finished artwork in our frame. The boys really loved seeing their work presented with such prestige.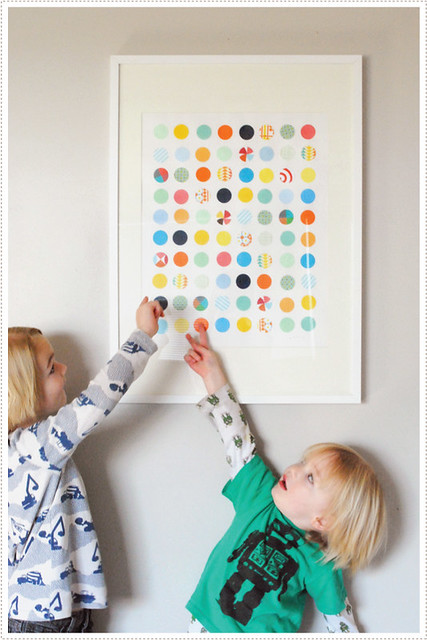
They also loved looking at particular circles they placed and were quick to point them out.
And like them, I'm so happy with the experience and how well the final product turned out. We did the second set of circles shortly after this one and I can't wait to put them above the boys beds!
(oh, and if you are thinking, "Little A needs a bit of haircut", well don't worry, he took matters into his own hands and snipped off the back of his hair yesterday...so no more mullet...and after a bit of repair...and a little lecture...it all ended up looking A-OK. Oh and we cut Little O's bangs so he can see now. :)).


Oo that's so cute!!
ReplyDeleteI wish my parents did that kind of stuff (or any art project) with me when I was younger. It probably would have helped me feel more confident about being creative at a much younger age.
Thanks for sharing!
this looks so great. and getting the kiddos involved would make it way more fun - thanks for all your great ideas!
ReplyDeleteFirst I have to say that your boys are so handsome!!! I love their hair!!!
ReplyDeleteThis project looks like so much fun. My son had fun making Valentine's Day cards for his class and he was intrigued by my heart craft punch. My circle punch is a little rusty and needs a bit of strength to use but I definitely want to try this.
How cool you actually made this! I love it when people do their own DIY. This is super cute!!!
ReplyDelete- Sarah
http://agirlintransit.blogspot.com
this is great! ...i want to do this myself ;)
ReplyDeletealissa b
http://www.alissab.us
Absolutely LOVE this. Thanks for sharing.
ReplyDeleteOh hey, I'm mer and I'm a CRAFT GODDESS WHO SERIOUSLY NEVER STOPS making the best projects EVER!
ReplyDeleteoh wait, I'm ALison. Just in love with Mer and her projects! THIS IS SO CUTE!
xo
Love it! Can't wait to try one with my son once he's a little older.
ReplyDeleteFun idea, and it turned out really cute.
ReplyDeleteI'm impressed that you let both your boys handle the glue. I'd have a hard time handing a glue bottle over to Joy, let alone Daniel.
I think I need to loosen up and care more about learning and playing than about having everything be just so.
I love this project. My little guy would get a total kick out of it I think. I like how you talk to them about the design and getting them to learn how to "see". So great. Your photos are vivid and beautiful.
ReplyDeleteKimberly, I'm picky about how much glue they use. Little A learned "dot dot, not a lot" in preschool (Oneonta :)) so we always say that. I'm quick to let them know if they are using too much.
ReplyDeletexo
Mer
I can't tell if my comment was sent or if there was a computer glitch, so I'm sending it again.
ReplyDeleteLOVE this idea. The colors are great and the simple pattern and frame really allow the dots to make the statement---rather than getting too busy. This is a great idea for adults too, can't wait to try one out!
As an aside, are you going to replace the missing dot, or was it taken off intentionally?
Ann
Hi Ann. I agree, this is a great craft for adults as well!
ReplyDeleteAnd as for the missing dot, they are all there but some of them look a little light in the photo so it might appear as though one is missing.
xo
Mer
This is beautiful! I've been trying to come up with artwork for a room with a lot of white with small bursts of color, so this would be perfect, and my son would love to help. (I will have to remember your glue mantra!)
ReplyDeleteCan't get over how simple yet so striking this project is! But best of all how it allowed your 2 boys to explore their creativity at such a young age. Kudos Mom!!!
ReplyDeleteI love this idea! And, I just included it in a roundup post of DIY art on my blog!
ReplyDeleteI like this. It's simple to do with kids but soo nice. Thank's for sharing!
ReplyDeleteLovely piece of art and I loved how you helped your little ones to develop a sense of colour and shape and design already. Great job!
ReplyDeleteThis looks like a lot of fun! Which brand of punch have you found works well for kids?
ReplyDeleteHi, this is a great craft to try! Where can I buy that circle craft punch? Is it available online? Thanks!
ReplyDeleteThis is fabulous!
ReplyDeleteCan't wait to let my kids make one and see how their individual style is represented.
Thanks for the inspiration.
Love from,
Greta
i gave this a go - thanks for the inspiration! you can see it here if you like
ReplyDeletehttp://www.anastasiac.blogspot.com.au/2012/04/neos-room-part-2-i-just-wanted-to-share.html
Great job Anastasia! I love the circle theme throughout the room.
Deletexo
Mer
This is such a fun, easy & effective project! Can't wait to try it with my eldest boys, also 5 & 3 (my 10 month old would just try to eat the paper, hehe!). Your boys remind me so much of mine - also blondies & they love these kind of activities! Thanks for the idea :)
ReplyDeleteWhat a gorgeous project and a great result! We've come a long way from macrame owls and pasta collages. Very inspiring
ReplyDeleteCute, cute, cute! (especially those little helpers!) I love the colors, too. I linked this up on my round up today: http://www.vixenmade.com/2012/07/10-diy-wall-art-projects.html
ReplyDeleteThat looks great! They must get a kick out of seeing it hanging in their rooms. Fantastic idea.
ReplyDeleteCannot wait to do this with my little boy for the nursery for the baby we are adopting! I really wanted H (my son) to be a part of the process and he will love doing this!!!
ReplyDeleteThis is such a cute artwork to make with the kids. My two girls would love making something like this for their bedroom. Think I'll be getting out the heart shaped hole punch and some colourful paper soon!
ReplyDeleteAwesome! I'm gonna try this at home...!
ReplyDeleteThis is so great! And I love your philosophy and way of handling the design aspect of the project. Thanks for sharing!!
ReplyDeleteThank you for this excellent idea! We have given it a try and you can se our result here: http://thesoutherninstitute.com/2013/06/diy-circle-punch-portrait.html/
ReplyDeleteBest regards from Sweden
Karin and Freja/Pysselbolaget