
[my new go-to baby gift...]
My older sister recently welcomed her 4th little girl into the world (5th child total, as she has one boy) and I couldn't be more happy for her. I wanted to celebrate this new little darling, baby Ella, so I decided to make her a quilt. I have had this idea for a simple herringbone quilt for some time now and was excited to have a chance to try my hand at it.
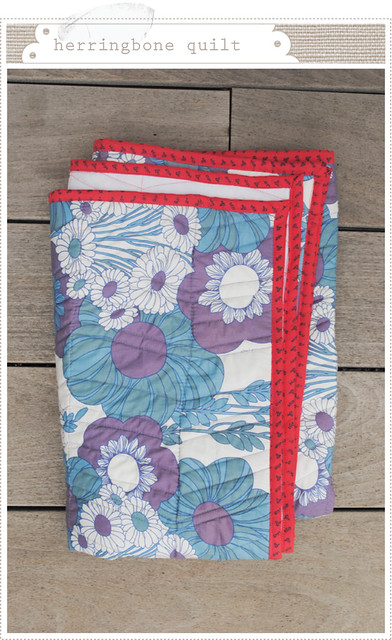
I chose to make this a smaller quilt, approximately 30"x 40", so it would be something baby Ella could snuggle up in while young and then perhaps convert it into a "lovey", that she could tote around with her, as she grew.
I knew I wanted the fabric and herringbone quilting to be the main focus so I chose to go without patch-working and to use only two sheets of fabric. I chose a floral vintage inspired fabric, that I purchased from reprodepot, back when they still sold fabric, and went with a solid white for the back side.
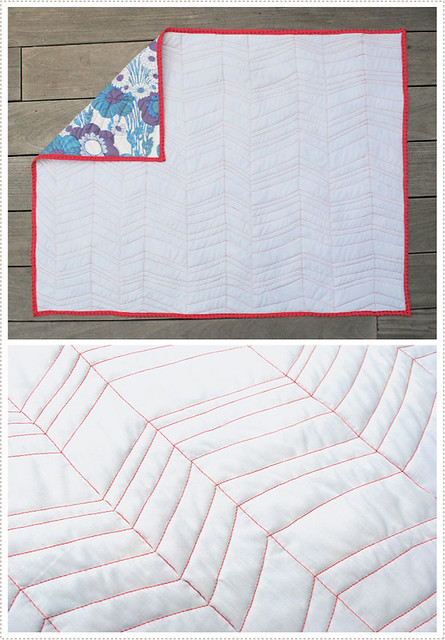
After placing batting between the two sheets of fabric I pin-basted everything together. I chose a coral pink top thread that corresponded with my binding and a blue bobbin thread that complimented the floral fabric and placed the white fabric side up to make it easier to see my stitches. I then chose where I wanted my vertical lines to go and machine quilted those first. I liked having them various widths apart but you could make yours more precise if you like. From there I just chose one end and started connecting my lines in a chevron/herringbone fashion. Again I liked the organic, freestyle nature of this project so I wasn't picky about how perfect the stitches were and made a point to vary the lines up a bit.
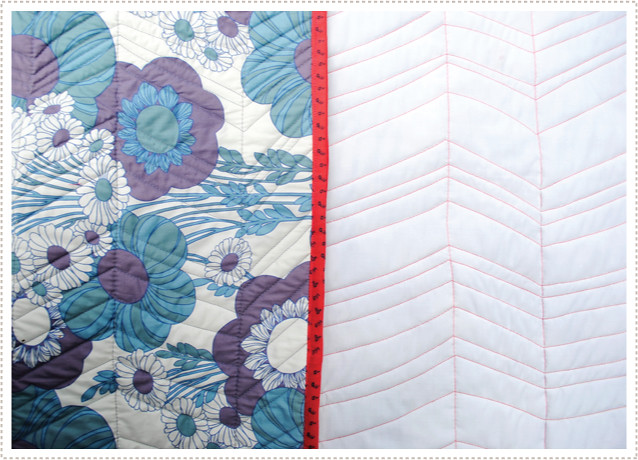
When the quilting was done I did a zig-zag stitch around the edges to make it easier to attach the binding. I wanted to binding to pop so I chose a bright coral pink fabric that had small blue flowers (found at Walmart for 1.99 a yard. score!) that I thought went well with the vintage quilt fabric. I love Heather Bailey's continuous quilt binding tutorial and referred to this when finishing up the binding.
I was happy with how easy it was! Not to mention slightly addicting. I seriously think this is my new go-to baby gift from here on out.


it looks lovely! and thanks for the link to the binding tutorial... i am finding the binding bit hard work.x
ReplyDeleteIt's so, so, beautiful. I love the fabric and the stiches on the backside. Well done! :)
ReplyDeleteBeautiful quilt. I'm sure Ella will love it.
ReplyDeleteI love it! What clever quilting -- beautiful, but it seems manageable.
ReplyDeleteOoh, very nice. I could do this.
ReplyDeleteI love how it turned out! I never got to see it with the binding. I love your herringbone quilting pattern! I might have to try that.
ReplyDeletethis is so pretty! i love the fabric choices! i just made a quilt for a friend's baby- out of scraps and things i had- just had to buy the backing. i like this though in that the top is one piece and it just looks so modern and minimal- but the quilting makes is vintage inspired too somehow. really well done! hope both girls love it! :)
ReplyDeleteThat blanket is very lovely. I like the colours and pattern you chose! :)
ReplyDeleteI love the quilting! I've never seen someone quilt herringbone-style :) It looks great!
ReplyDeleteA quilt is such a lovely, sentimental gift! Great job!
ReplyDeletewhat a special and creative gift!
ReplyDeleteLove that fabric :)
this is such a sweet little blanket! I love the colors and the pattern - slightly vintage feel of the flower fabric - so great!
ReplyDelete